Disaster recovery strategies are important for any business to protect its digital assets and continue business operations during a failure or disaster.
A disaster recovery plan will ensure your files are backed up and allow you to recover data stored on Azure VMs, services, and databases.
Restoration is not immediate. When designing a disaster recovery strategy, it is important to evaluate the following:
- Recovery time objective (RTO): how long business operations can continue without access to systems.
- Recovery point objective (RPO): how many hours of data loss is acceptable.
Everyone wishes for these to be zero, but that is an ideal that would be very expensive and almost impossible.
It is important that businesses draft a set of realistic plans and procedures to execute in the event of a disaster.
Everyone has a plan until they get punched in the mouth.
Mike Tyson
Azure Backup
Azure Backup can backup Azure or on-prem services and will be your first line of defense for disaster recovery of Azure VMs. Data, workloads, and machine state can all be configured to back up automatically.
- Unlimited data transfer and no limit on retention times.
- Backs up disks, files, and folders, and supports SQL Server, SharePoint, and Exchange.
- Stores backups in an Azure Recovery Services vault where they can be monitored and managed.
Types of backup agents:
- System Center Data Protection Manager (DPM): Server that makes app-aware backups for on-prem servers/VMs. Supports tape. Linux disk backup only.
- Paid per license
- Microsoft Azure Backup Server (MABS): Server that does app-aware backups of on-prem servers/VMs, Linux disk backup only.
- Free to use, pay for storage
- Microsoft Azure Recovery Services (MARS): Agent backs up Windows files and folders ONLY. Moves backups to Recovery Services vault. Not app-aware, suitable for laptops or secondary backup of backup servers.
- Free service
- Azure Backup Agent: Most simple backup method. Backs up Windows and Linux Azure VMs with snapshots. App-aware for Windows. Snapshots: A point-in-time backup of all disks on the VM. Snapshots are app-consistent for Windows VMs with VSS.
Snapshots and recovery points can be used for VMs with specified frequency and retention history.
- Crash-consistent: snapshot captures all data on the disk but not memory. Default is every 5 minutes.
- App-consistent: snapshot captures all data on disk but also in-memory data and in-process transactions. Default is every 60 minutes.
Snapshot retention default is 24 hours but can be extended to 72 hours.
For Linux app-consistent backups you will need to configure pre/post scripts to capture application state.
Soft Delete: Accidentally deleted VM backups are available for 14 days.
QUICK START
Backup an Azure virtual machine:
- Select the virtual machine and click Backup on the left side menu.
- Create a new Recovery Services Vault or select an existing one.
- Create a backup policy or use the default policy to backup daily with a 30 day retention period.
- Click Enable Backup.
- On the backup menu select Backup now.
SQL server backup options:
- Full: Entire database and file groups backed up, including transaction logs. (default is every week)
- Differential: Captures blocks of data that have been changed since the last backup. (default every 12 hours)
- Transaction log: Backs up transaction log to allow a point-in-time restoration. (every 5-10 minutes)
SQL Backups are retained for 7 – 35 days, depending on purchasing model and service tier.
- Basic retention: 7 days.
- Standard and premium retention: 35 days.
Long term retention (LTR) backups are kept up to 10 years.
LTR policies use letters for frequency: W for weekly, M first week every month, Y yearly. Numbers indicate retention.
Example: W=0, M=0, Y=5, WeekOfYear=1 : Policy will back up the first week of year and retain it for 5 years.
Restoring Backups
VM backups can be restored to a new VM, have disk storage restored, or replace existing VM if it hasn’t been deleted.
Restorations can take an average of 12 hours for large databases.
You can replace the current database and rename it with ALTER DATABASE or just recover the data and extract it.
Failover: current live environment is moved over and replaced by a replica during disaster recovery.
Failback: opposite of a failover, where the replica is replaced by the original live environment and no data is loss.
Failover Process:
- Failover is started, virtual machines are created in Azure from the replicated data.
- Azure VMs replication re-enabled (45min-2hrs), VMs must be shut off to failback without data loss.
- Failback initiated, VMs must be replicated to on-site VMs, not physical servers.
- On-premises VMs running, replication re-enabled.
Typical Priority:
- Active Directory and DNS are usually the first to be recovered to aid the restoration of other services.
- SQL servers can be migrated and scaled for peak loads.
- Web and application servers can failover at the same time in groups with simultaneous replication. IIS failover can be fully automated.
Quickstart
Restore an Azure virtual machine:
- Select the virtual machine and click Backup on the left side menu.
- Select File Recovery at the top of the Backup menu.
- Select a recovery point for the VM (date of last backup) and copy the password.
Windows:
- Download the executable and save it.
- Navigate to the file and run it as administrator.
- Paste in the password.
- The drives will be mounted in storage. Use Windows Explorer or File Explorer to navigate to the files.
Linux:
- Download the python script.
- Make the script executable:
chmod +x <file name> - Run the file:
./<file name> - The volumes of the recovery point are mounted to the folder where the script is run. The script will output the file path.
- Unmount Disks after the files have been restored.
Azure App Disaster Recovery
Azure App Service is a PaaS offering that hosts enterprise-grade web applications that allow Azure applications to be highly scalable, highly available, robust, and resistant to failure.
Web applications hosted on Azure App Service have infrastructure that is managed by Azure. This means patching, updates, scaling, and backup features are automatic and can be performed much quicker than manual operations.
Azure App Service backs up the following:
- App configuration
- File content
- Database connected to your app
Azure App Service also provides real time log streaming and Azure App Service diagnostics so that you can view application logs, errors, and usage reports.
An Azure application hosted on Azure App Service has a highly available disaster recovery plan that allows an application to be much more resistant to failure. Applications can be replicated to secondary regions in the event of an outage and paired with Azure Frontdoor to handle failover.
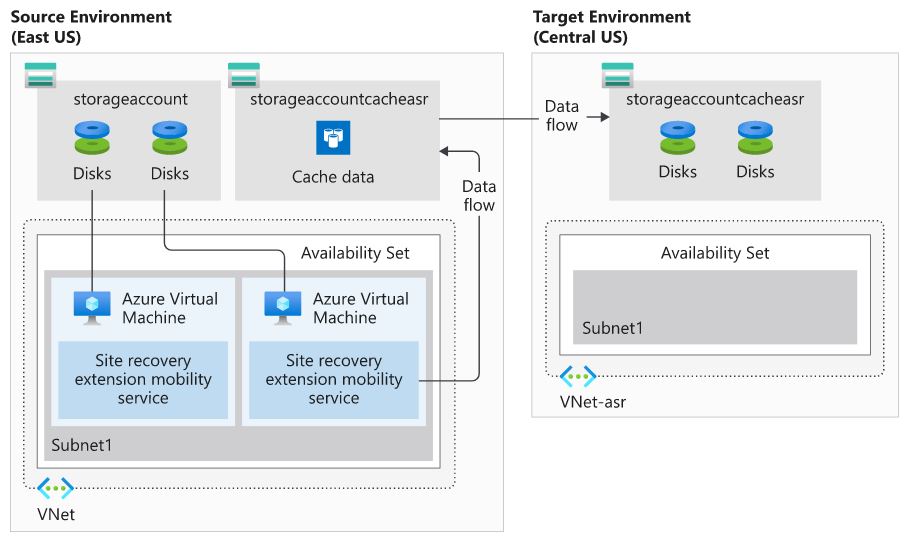
Azure Site Recovery
Azure Site Recovery has tools to recover from system outages, replicate systems to secondary sites and backup on-premises VMs to Azure.
- Disaster recovery or migration of on-premises machines to Azure.
- Disaster recovery of Azure VMs, between Azure regions.
- Manages failover and failback.
- App consistent snapshots for virtual machines
- SQL Always On support
- Allows you to test disaster recovery
- Network management in event of disaster and automation libraries
It can’t be used to failback Azure VMs back to physical servers, only to migrate them to the cloud.
Supported machines:
- Physical Windows/Linux servers
- Azure VMs
- Hyper-V VMs
- VMware VMs.
Incorporating these toolsets into your disaster recovery plan can mean the difference between hours and weeks for recovery.
Fortunately automatically backing up and restoring cloud infrastructure is much easier and reliable than on-premesis options.
To learn about the storage replication options from Azure, read here.
Access the official Microsoft documentation on Azure backup here.